Protecting Your Home’s Foundation with Leaf-Free Gutters
Protecting your home from water damage is crucial. In July 2026, experts continue to highlight that functional gutters are your first line of defense. When these systems fail, rainwater can severely damage your foundation, erode soil, and even cause basement flooding. These issues often lead to very expensive and stressful repairs.
Our extensive guide is designed to empower you. We will walk you through the essential steps for effective gutter installation. This includes understanding the most common gutter types, sizes, and styles. We will also explore crucial preparation, various installation techniques, and best practices for securing your system.
By following our detailed instructions, you can ensure efficient water diversion and superior debris management. This is especially true when considering advanced protection, such as a patented K-Guard Leaf Free Gutter system. Our aim is to provide you with the knowledge to safeguard your home’s structural integrity for years to come.
Understanding Gutter Types, Sizes, and the Role of Leaf-Free Gutters
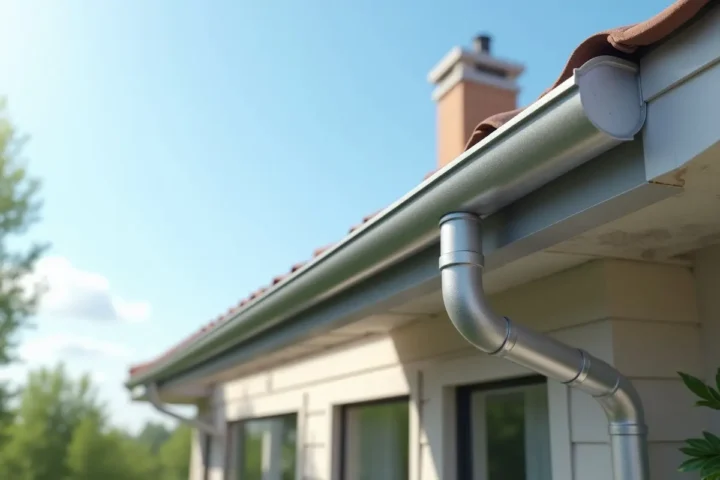
When embarking on a gutter installation project, one of the first critical decisions involves selecting the right gutter type and size for your home. The market primarily offers two common styles: K-style and half-round gutters, alongside specialized options like super gutters for screen rooms or pool cages.
K-style gutters, with their decorative ogee front profile, are the most prevalent choice for residential properties across the USA. They are often referred to as “ogee” gutters due to their distinctive shape. These are typically available in 5-inch widths for standard homes, but 6-inch K-style gutters are common for larger residential properties or commercial applications where greater drainage capacity is required.
Half-round gutters, characterized by their classic, semi-circular shape, are often chosen for their aesthetic appeal, particularly on historic or architecturally distinctive homes. They are also typically found in 5-inch and 6-inch sizes. “Super gutters” are a less common, larger profile often used in specific applications like screen enclosures or pool cages, designed to handle significant water volumes.
The size of your gutters directly impacts their drainage capacity. A 5-inch gutter is generally sufficient for most residential roofs, but homes with large or steep roof sections, or those located in areas with heavy rainfall, may benefit significantly from 6-inch gutters. Proper downspout spacing is equally crucial for effective drainage. Industry standards recommend installing a downspout for every 30 to 50 feet of gutter length.
This ensures that water is efficiently channeled away from the roof and foundation, preventing pooling and overflow. For instance, a 2×3 inch downspout can handle approximately 186 gallons per minute, while a larger 3×4 inch downspout can manage an impressive 434 gallons per minute, highlighting the importance of matching downspout size to your gutter system’s capacity and local rainfall.
Why Traditional Systems Fail and the Need for Leaf-Free Gutters
Traditional open-top gutter systems, while functional, come with inherent limitations that often lead to costly maintenance and potential home damage. The most significant drawback is their susceptibility to debris accumulation. Leaves, pine needles, twigs, shingle grit, and other organic matter can quickly clog gutters, especially during autumn or after storms. This necessitates frequent, often annual, cleaning to maintain their effectiveness.
Gutter cleaning, however, is not just a chore; it’s a hazardous task. It often involves working at heights on ladders, posing significant safety risks. Homeowner maintenance reports indicate that while properly installed gutter guards can reduce cleaning frequency by up to 75%, traditional systems still demand regular attention. When gutters become clogged, water cannot flow freely and will inevitably overflow. This overflowing water can cause a cascade of problems, including:
- Fascia Rot: Constant exposure to moisture can cause the wooden fascia boards behind your gutters to rot, leading to structural damage and attracting pests.
- Foundation Damage: Water spilling over the gutter edge pools around the foundation, saturating the soil. Over time, this can lead to hydrostatic pressure against the foundation walls, causing cracks, leaks, and even structural instability.
- Basement Flooding: A compromised foundation or direct water runoff can lead to basement flooding, resulting in extensive property damage, mold growth, and expensive remediation.
- Landscape Erosion: The uncontrolled deluge of water can erode landscaping, wash away topsoil, and damage plants around your home’s perimeter.
This is where leaf-free gutter systems, such as the K-Guard system, offer a solution. Designed to prevent debris from entering the gutter trough while allowing rainwater to flow freely, these systems aim to eliminate the need for annual cleaning.
A professionally installed leaf-free system provides a lifetime guarantee against clogging, effectively offering zero maintenance for the homeowner. While the average house installation for a comprehensive leaf-free system is approximately $5,000, this investment offers significant long-term value by protecting your foundation, reducing maintenance costs, and providing unparalleled peace of mind.
Step-by-Step Gutter Guard Installation and Configuration Methods
Installing a gutter guard system effectively requires careful planning and execution, beginning with thorough preparation. Before any panels are installed, the existing gutters must be meticulously cleaned and tested. This involves removing all debris, flushing the gutters with water to ensure proper drainage, and making any necessary repairs to the gutter itself.
A clogged or damaged gutter beneath a new guard system will negate its benefits. Next, accurately measure the length of your roofline and the opening of your gutters to confirm material requirements and ensure a precise fit for your chosen panels. Sheet metal tools, such as tin snips, will be essential for trimming panels to size.
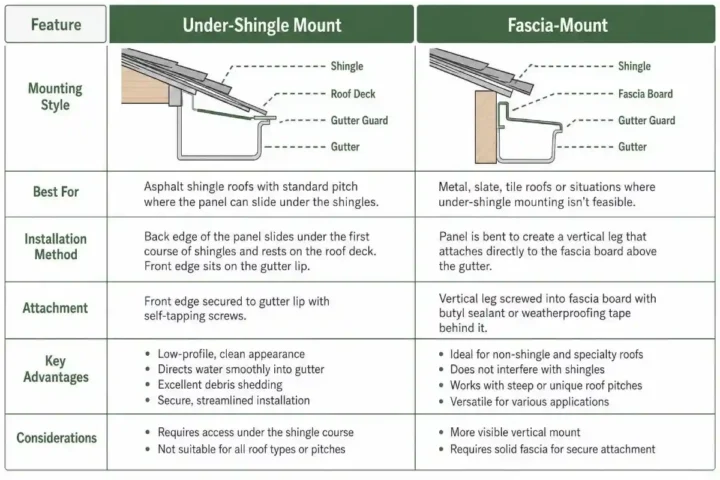
There are several common methods for installing gutter guard panels, each suited to different roof and gutter configurations:
- Under-the-Shingle Mount: This is a typical method for asphalt shingle roofs. The back edge of the gutter guard panel is designed to slip underneath the first course of shingles, resting on the roof deck. The front edge then attaches to the lip of the gutter, often secured with screws. This method creates a continuous, low-profile barrier that effectively sheds debris while guiding water into the gutter. When installing, ensure the back edge is tucked at least 1/4 inch below the edge of the next higher shingle layer to prevent water from wicking back up.
- Fascia-Mount: For specialty roofs like metal roofing, slate, or tile, or when an under-shingle mount isn’t feasible (e.g., due to roof pitch or shingle type), a fascia-mount method is employed. Here, the gutter guard panel is typically bent to create a 90-degree vertical leg that attaches directly to the fascia board. This often involves applying a butyl sealant or similar weatherproofing tape behind the mounting surface before screwing the panel into place. This method is also common for “super gutters” on screen enclosures where a traditional shingle-tuck isn’t an option.
- Over-Shingle Mount: Some systems are designed to sit directly on top of the shingles, extending over the gutter opening. These are often secured with roof screws and may utilize butyl sealant for waterproofing. While simpler to install, care must be taken to avoid damaging shingles or creating “roof ramping,” where the guard lifts the shingles, potentially compromising the roof’s integrity.
Micro-mesh panels are a popular choice for gutter protection due to their fine filtration capabilities, preventing even small debris like pine needles and shingle grit from entering the gutter. Regardless of the mounting method, it’s crucial to ensure the mesh trough sits at least 1/8 inch below the front lip of the gutter to promote proper water flow and prevent overflow during heavy rainfall.
We can illustrate the differences between common installation methods:
Professional vs. DIY: Installing Leaf-Free Gutters Safely
While some gutter guard systems are marketed for DIY installation, the complexity of working at heights, coupled with the need for precise measurements and specialized tools, often makes professional installation the safer and more effective choice. Safety should always be the paramount concern. Essential safety gear includes gloves, safety glasses, and appropriate footwear. When using a ladder, always employ ladder standoffs to maintain stability and protect your gutters. Crucially, be aware of power lines and maintain a safe distance from them. Never use products to support your weight when working above ground level.
DIY installation requires specific tools such as sheet metal snips for precise cuts, a drill for self-tapping screws, and potentially a hand brake for custom bends. Understanding how to properly handle inside and outside corners, manage varying roof pitches, and ensure proper water flow requires a keen eye and attention to detail.
Opting for professional installation, especially for comprehensive leaf-free systems like K-Guard, offers several advantages. Professionals are equipped with the right tools, extensive experience, and a deep understanding of various roof and gutter configurations. They ensure seamless integration of the system with your existing home structure, maintaining aesthetic appeal and, most importantly, structural integrity.
Their expertise minimizes the risk of common installation mistakes, ensuring your system performs optimally and provides the long-term protection you expect. The investment in professional installation often translates to peace of mind and a guarantee of performance that DIY efforts may not always achieve.
Advanced Techniques: Handling Corners, Steep Pitches, and Securing Methods
The successful installation of a gutter protection system extends beyond simply attaching panels along straight runs. Handling corners, addressing steep roof pitches, and choosing the right securing methods are crucial for optimal performance and longevity.
When dealing with corners, precision is key. For inside corners, panels must be cut at an angle to meet perfectly, often requiring an overlap or a custom-fabricated piece to ensure a seamless transition and prevent debris entry. Similarly, outside corners demand careful cutting and fitting to maintain the system’s integrity. End caps, which close off the ends of gutter runs, must be fully closed and secured, ensuring no openings larger than 1/4 inch to prevent small animals or large debris from entering.
When joining straight sections of gutter, a minimum 3-inch overlap is recommended to maintain water tightness and structural integrity. For gutter guard panels, leaving a small 1/8-inch expansion gap between adjacent plates is good practice to account for thermal expansion and contraction, especially with metal components.
Steep-pitch roofs present unique challenges. If gutter guards are installed at the roof’s exact pitch, water can overshoot the gutters during heavy rainfall due to increased velocity. Modifications are often necessary to ensure proper weep hole drainage and water capture. One technique involves slightly prying open the weep drain gap on the gutter guard with a putty knife to encourage water entry.
Another method is to create a vertical bend along the stiffener rib line of the panel using a brake, effectively lowering the front edge relative to the back, achieving a more gradual slope for water entry. It’s essential to prevent common installation mistakes such as “roof ramping,” where the gutter guard lifts the shingles, compromising the roof’s seal, or obstructed weep holes, which can lead to water pooling.
When it comes to securing methods, installers typically choose between adhesive tape and mechanical fasteners (screws):
- Tape (e.g., 3M VHB tape):Pros: Provides a clean, screw-free aesthetic; can offer a strong, waterproof bond; ideal for specific roof types where screws are undesirable.
- Cons: Requires specific installation conditions (e.g., 65+ degree Fahrenheit weather for optimal adhesion); requires thorough surface cleaning with rubbing alcohol or acetone; needs 12 hours to cure fully; less forgiving for adjustments after placement.
- Screws (mechanical fasteners):Pros: Provides a very secure, durable attachment; allows for easier adjustments during installation; generally not temperature-sensitive for installation.
- Cons: Creates penetrations in the gutter (though self-tapping screws are designed for this); visible fasteners may be less aesthetically pleasing to some. Screws should be placed approximately 1 inch from each end and in the middle of each panel, ensuring they are installed at a 90-degree angle and maintain a positive panel pitch.
Overcoming Structural Challenges with Leaf-Free Gutters
Beyond standard installations, various structural challenges demand specialized techniques to ensure effective gutter protection.
Low-hanging gutters or those on flat roofs (like porches or gazebos) may require panels to be bent or custom-fitted to achieve the necessary slope for debris shedding and water entry. For instance, panels can be bent up or down using simple tools like two 1×2 boards and clamps to create a custom profile that fits the unique gutter-to-roof configuration.
Irregular shingle surfaces, such as thick staggered or shake shingles, often necessitate custom cutting and bending of the gutter guard’s upper edge to maintain proper contact and prevent gaps. For instance, a cut extending 1 1/2 to 2 inches perpendicular to the top edge can allow the panel to conform to the shingle’s irregularities. Proper drip edge integration is also vital; the gutter guard should ideally sit beneath the drip edge to ensure all roof runoff is directed into the gutter system, not behind it.
Wind load resistance is a significant factor, especially in commercial applications or high-wind areas. Micro-mesh gutter protection systems are engineered to withstand substantial forces, with some commercial systems designed to handle up to 430 psf sustained wind pressures. For residential installations in windy regions, additional securing measures, such as using vinyl tubing as retainers over GutterHook points, can prevent panels from lifting.
Finally, managing dissimilar metal barriers and thermal expansion is critical for long-term durability. When gutter guard panels come into contact with different metals (e.g., aluminum panels on a copper gutter), a barrier should be used to prevent galvanic corrosion. Moreover, all gutter components, especially vinyl systems, require expansion gaps (e.g., 5 mm between sections) to accommodate temperature changes, preventing buckling or cracking. The rear rail of some gutter guards is intentionally shorter than the front to allow for minor home shifting and settling without compromising the system.
Frequently Asked Questions about Gutter Systems
Understanding the nuances of gutter systems and their protection is key to effective home maintenance. Here, we address some of the most common inquiries regarding gutter protection and warranty coverage.
How much does a professional leaf-free gutter system cost?
Investing in a professional leaf-free gutter system is a significant decision for many homeowners. While costs can vary based on factors like home size, roof complexity, and specific system chosen, the average house installation for a comprehensive leaf-free gutter system is approximately $5,000. This figure reflects not just the materials but also the expert labor, specialized equipment, and often a robust warranty that accompanies such an installation.
It’s important to view this as a long-term investment rather than a mere expense. The value lies in the unparalleled foundation protection it offers, preventing costly water damage, erosion, and potential basement flooding. Systems like the K-Guard system are designed to provide a lifetime of protection, significantly reducing or eliminating the need for hazardous gutter cleaning and contributing to the overall longevity and value of your home. The peace of mind gained from knowing your home is protected from water damage often outweighs the initial cost.
Can gutter guards completely eliminate the need for gutter cleaning?
This is a common question, and the answer, for most traditional gutter guards, is nuanced. While properly installed gutter guards can reduce gutter cleaning frequency by up to 75%, the claim of “maintenance-free” is often marketing hype for many products. Most gutter guards, especially those with larger mesh or slots, will still accumulate some debris on their surface, which may require occasional brushing or rinsing to ensure optimal performance.
However, advanced leaf-free systems, such as the K-Guard system, are specifically engineered to offer a lifetime guarantee against clogging, effectively providing zero maintenance. Their patented design channels water efficiently while shedding debris, preventing it from entering the gutter trough. This level of performance truly minimizes, if not eliminates, the need for hands-on cleaning, allowing homeowners to enjoy the benefits of a consistently clear and functional gutter system.
What is the best way to handle steep roof pitches during installation?
Steep roof pitches pose a unique challenge for gutter guard installation because the increased velocity of water runoff can cause it to “overshoot” the gutters, even with protection in place. To prevent this, specific adjustments are needed.
One effective method involves modifying the gutter guard panel itself. Installers can either gently pry open the weep drain gap on the panel using a putty knife, creating a wider opening for water to enter, or they can create a vertical bend along the panel’s stiffener rib line using a brake. This bending technique effectively lowers the front edge of the panel relative to the back, creating a more gradual slope that encourages water to flow into the gutter rather than over it.
For steep roofs, an ideal installation slope for the gutter guard itself is often between 5-10 degrees, rather than matching the roof’s steeper pitch. These adjustments are crucial for ensuring proper water runoff prevention and maintaining the system’s effectiveness. Professional configuration is highly recommended for steep-pitch applications to guarantee these modifications are executed correctly and safely.
Conclusion
As we navigate the challenges of homeownership in July 2026, the importance of a robust gutter system cannot be overstated. It stands as a silent guardian, diligently diverting rainwater away from your home’s foundation, preserving its structural integrity, and protecting against costly water damage.
Our guide has traversed the landscape of gutter installation, from understanding diverse types and sizes to mastering intricate installation techniques for corners and steep pitches. We’ve emphasized the critical role of preparation, the nuances of securing methods, and the paramount importance of safety.
Investing in a high-quality, leaf-free gutter system is a wise long-term investment in your home. Systems like the K-Guard system, with their lifetime guarantee and promise of zero maintenance, offer unparalleled peace of mind. By safeguarding your foundation and eliminating the chore of gutter cleaning, you not only protect your most valuable asset but also enhance your home’s value and ensure its beauty for years to come.